|
Mortise Hinge
7/8"
Thick Door
1-1/4"
Thick Pilaster [ Post ]

-
80- 4040-BC -
[ Brass-Chrome ]
-
80- 4040-CS -
[ Cast Stainless ]
-
80- 4040-ZC -
[ Zamak-Chrome ]
Packing List
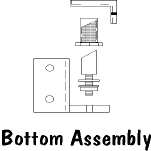
- 1 - 1-1/4" upper hinge bracket with
3/8" bushing
- 1 - 1-1/4" lower hinge bracket with pintel
assembly.
- 1 - Thru bolt Fastener Pack 81-004-10
- 1 - Flange Pack 81-060-01
- 1 - Pin Cam Pack 81-060-02
Sizing of
Door
- Be sure that pilasters are plumb, level and securely anchored. Select
proper door size and color.
- Correct door is 9/16" less than door opening.
- Example : 24" opening width = 23-7/16" door - Standard height
is 58"
- Door is normally mounted 12" above finish floor. - Align with
divider panels.
Upper Door
Preparation
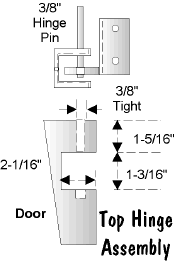
- Refer to Upper hinge detail.
- Top hinge must be notched into the upper side of door.
- Using the upper door flange as a template, drill a 3/8" hole down
thru the top edge of door for the hinge pin. Note - the hole must be snug to
keep the pin from walking out when used.
- Insert upper door flange into notch and secure with phillips head
screw, furnished.
Lower Door
Preparation
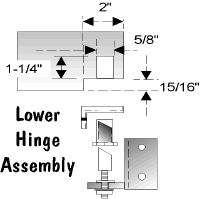
- Refer to Lower hinge detail.
- Lower hinge must be notched into the Bottom corner of door.
- Using the lower door flange as a template, drill a 5/8" hole for
the pivot cam.
- Insert lower door flange into notch and secure with phillips head
screw, furnished.
Hinge
Location on Pilaster
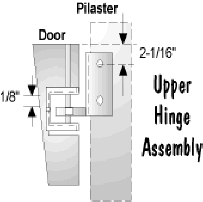
- On pilaster, determine the top of door, standard door height is
58" and installed 12" above finish floor.
- Position upper hinge bracket on pilaster and attach upper hinge bracket
to pilaster with 1-way barrel nuts and shoulder screws. 1/4" holes are
required.
- Refer to detail for positioning of bracket.
- The upper hinge bracket has a 3/8" hole with bushing.
- Hang door from top hinge, place a 1/8" spacer between hinge and
upper flange. This gap is required to allow hinge to ride up when opening.
Note:
Be sure hinge bracket cannot move away from
pilaster when the weight of door is applied. Tighten securely.
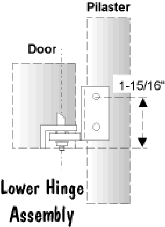
- Insert 5/8" cam into lower hinge flange. Note hex neck on cam, this must seat in the hex hole in the flange.
- Insert the pintel [ male ], attached to the lower hinge, into the cam,
fully seated. It may be necessary to loosen the lock nut on the bottom of
the hinge bracket so the pintel can turn freely.
- With the pintel fully seated, position hinge bracket on pilaster and
mark hole locations.
- Drill 1/4" holes and install lower hinge bracket.
Install Door
- Place door with cam in place in bottom flange.
- Drive hinge pin into top 3/8" hole, thru the upper hinge bracket,
tap until flush.
Note:
If pin can be pushed into the hole, the pin
may walk out. Use tape or other methods to snug pin in hole.
Max door size - 34" x
58" - 80 lbs.
Adjustment
- Loosen hex nut on bottom of lower hinge bracket,
pintel assembly so the pintel can rotate.
- Position the door at the desired at rest position
then secure the pintel.
Maintenance

|